|
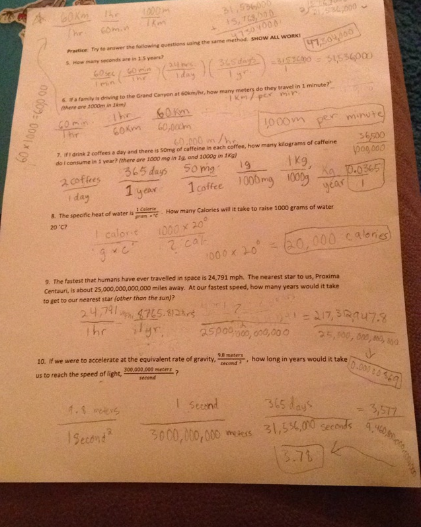
Below are photos of my take home quiz and my work for each problem on scratch paper. The answer to each question is written next to each question on the quiz. 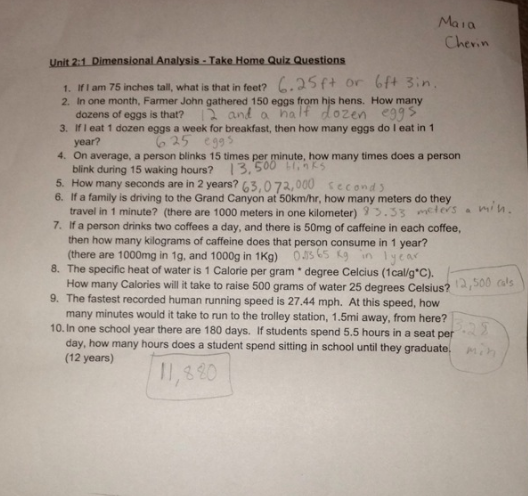 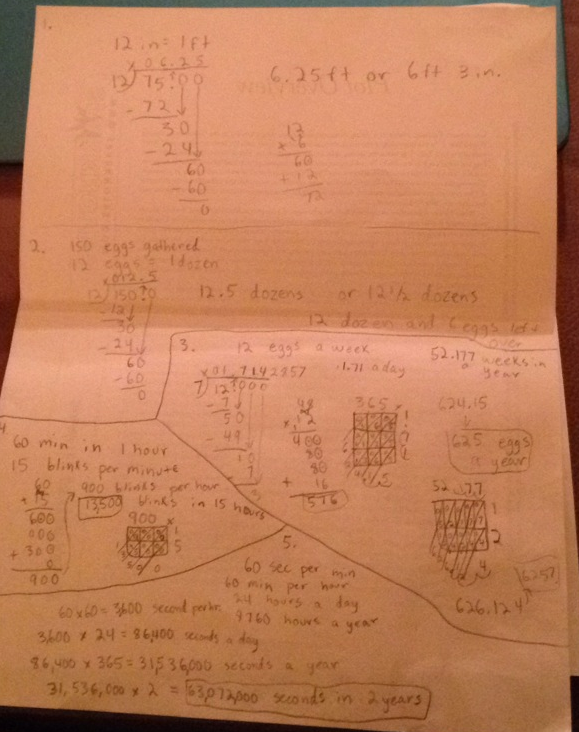 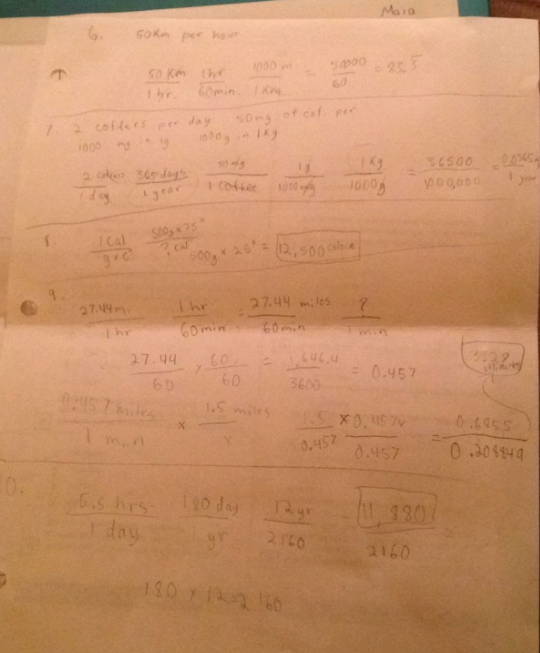 Reflection on Take Home Quiz: I think my take home quiz went well. On some problems I was able to use techniques I learned on the worksheet, and on others, I was able to use methods of my own and solve differently.
25 Comments
Below are photos of the Dimensional Analysis worksheet I did from Unit 2 Measurement, Topic 2:1. 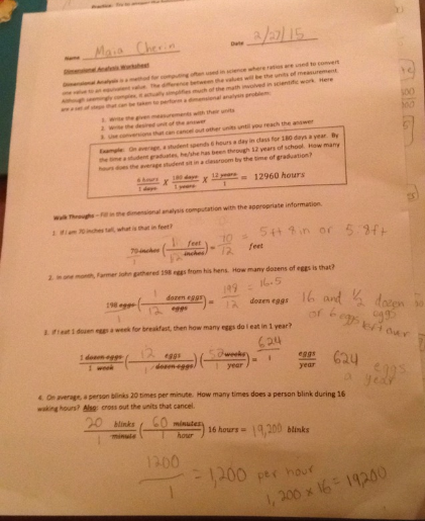
Monday: Today with my friends Betty, Nayeli, and Audrey Sutton, we researched different experiments. We came across one that caught our eye and it was a lab that shows how to make polymer bouncy balls. To make the bouncy balls, we would need: borax, cornstarch, warm water, food coloring, measuring spoons, a stirring stick, 2 cups/containers, a marker, and a ziploc bag. When we planned this lab we had the essential question(s) of: What is a polymer? How can you make a ball from a polymer? What makes a polymer bounce? To answer these questions, we plan on running the lab Wednesday. The tutorial we found on this lab can be found here: http://chemistry.about.com/od/demonstrationsexperiments/ss/bounceball.htm Wednesday: It's experiment day! We gathered all of our materials and set up a table to run the lab at. First, we all wrote on one of our cups "ball mixture", and the other "borax solution". While the others in my group were setting up the materials, I went to the sink and got a bowl of warm water. Once I had the water, we were ready to start. First, we put 2 tablespoons of warm water and 1/2 teaspoon borax in the "borax solution" cup and stirred until the borax was dissolved. Next we put 1 tablespoon of glue in the "ball mixture" cup along with 1/2 teaspoon of the "borax solution" we made and 1 tablespoon of cornstarch. We swirled around the ingredients in this cup until they looked somewhat solid, and started to stir. After it was stirred we took out the mixture and started forming it into ball. Sadly, the balls didn't look the same way they did in the tutorial, and we thought we did something wrong, so we all made a second ball. On our second try we followed the instructions carefully and paid more attention to the accuracy of our measurements. Once we finished following all the steps, the balls seemed to form better, but still weren't all the way dry, so Nayeli and I went to the bathroom and used the hand dryers to help harden the mixture. When we came back, we were able to form the mix into a ball, except it kept crumbling. We realized that by dipping the ball in water and putting some cornstarch on our hands would help to form the ball. Eventually I was able to actually form a ball, but it still did not bounce as it wasn't fully dry. I set mine up in a cubby and left it over night, but when I returned the next day it had flattened into a pancake shape. In the end, we all were able to create polymer balls, but Betty's was the only one to fully dry and bounce. The science behind our polymer bouncy balls:
First off, what's a polymer? Polymers are made up of a ton of molecules strung together in the form of a chain. The way a polymer acts depends on how the molecules are connected. Monomers are what mainly build up polymers. Monomers are small molecules formed together in a repeating pattern that form polymers How can you make a ball from a polymer? In order to make a ball, we had to go through the process of polymerization. Polymerization is essentially the process of multiple smaller monomers bonding together to create the polymer, or in our case a rubbery like bouncy ball. When going through polymerization chemical groups in the monomers are lost so that they may join together. In our experiment the glue was what formed a more rubbery substance, which allowed the ball to bounce. Final Reflection: Overall, I found this experiment very fun and interesting. It was fun to work with some new people and I enjoyed it. I hope to work with these people again soon. One thing I would change is paying close attention to the instructions. I think there was some confusion when we wrote them down, which caused us to mess up in our lab. Next time I plan on printing the instructions from the tutorial, rather than using the paraphrased ones my group came up with. In today's chemistry class, we started off with a lesson on atoms and how they react with each other. First off, I heard the definition of an atom: The smallest unit of any element. I learned that an atom is made of subatomic particles, such as: protons, which are positive and are in the nucleus, electrons, which are negative and orbit around the nucleus, and neutrons, which are also in the nucleus and are neutral meaning they have zero charge. Protons and Neutrons have a significant mass, but electrons do not. We also learned how to tell what an atom looks like from an element. Looking at the element Hydrogen, with an atomic mass of 1.0079 and an atomic number of 1, we can see the number of neutrons, protons and electrons. To see the number of protons and electrons, we look to the atomic number. In this case Hydrogen has an atomic number of 1, so there would be 1 proton and 1 electron. To find the number of neutrons, we round the atomic mass to the nearest whole number and subtract the atomic number from it. With hydrogen we would round the atomic mass to 1 and subtract 1 (atomic number) to get 0 as our number of neutrons. Once we finished the lesson, we did a lab involving magnesium, citric acid, water, and a small balloon. We first received an empty flask that we rolled small pieces of magnesium into, then using a funnel we added citric acid. After both the magnesium and citric acid were in the flask, we added water. The flask started to feel warm because energy was being created as the liquid turned into a gas. As soon as the water was poured into the flask, we stretched a balloon over the top. The balloon slowly filled with hydrogen, a product of all the ingredients combined. After the balloon was filled completely, Andrew tied it to seal in the hydrogen. We played around with the balloon for a while as it floated around us. At one point we accidentally let go and it stuck to the ceiling. Eventually we got it back down and sent one volunteer from each group up to the front. Each volunteer held their balloon in the dark over 2 small birthday candles. We watched the balloons pop, moments after they came close to the flames. Overall, this was a simple, yet very enjoyable lab. Monday: During today's chemistry class, Audrey and I took pictures with our pinhole cameras. Audrey, Morgan, and I first went into one of the staff bathrooms and turned the lights off. This was so that when we were loading the photo paper into our cameras it wouldn't be exposed to light and ruin the paper. The only source of light we had to see with was a small amount of red light coming from a cellphone. While we were in there, we unpackaged the photo paper, taped it in place in our cameras, and sealed the cameras from any light. We also resealed the photo paper in a black bag so that we could use the paper again the next day. After about half an hour of working to get the photo paper properly placed in the cameras, we headed outside to Liberty Station and took our pictures. Once we had reached the grass in the middle of Liberty Station, Audrey and I each took one photo with our cameras. I set my camera up on a map sign and angled it to shoot the row of trees that goes throughout the field. After setting up the camera, I pulled down the flap, exposing the pinhole to light, and left it to sit still for 4 min. We did the same with Audrey's camera, except she used mine as a tripod and angled hers from the ground up, shooting the tower above the fountain at Liberty Station. We feel like once we develop the photos, they will have a vintage feel to them, as they will be in black and white. Audrey and I hope our photos turn out very well, and are excited to finally see them on either Wednesday or Thursday when we develop them. Tomorrow we plan to each take one more photo with our pinhole cameras. Tuesday: Audrey and I went back into the dark room and reloaded our cameras. We first took our photos from yesterday, and stored them in a black bag. Next, we went through the same process as yesterday, and each put a new piece of photo paper in our cameras. We then went outside, and had our two friends, Audrey Ensworth and Indigo, pose for our photos. We let the exposure go longer today for 5 min, which will hopefully improve the photo quality later on when we develop the images. Tomorrow I plan on buying the fixer and developer chemicals, as well as a container to develop our photos in on Thursday. 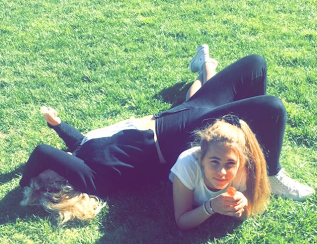 What our photo of Audrey and Indigo will hopefully look like when developed. (except in black and white) Wednesday: It turns out Andrew purchased the other chemicals we needed and we are very thankful. Unfortunately, developing pictures is going to take up more space than a staff bathroom, so we need to set up a time with Andrew to develop the photos. We plan on covering the window of the classroom door and purchasing an actual red light, to allow us to have a better darkroom. Audrey and I hope to be able to develop the photos on Tuesday at lunch.
Thursday: Today, my partner Audrey Sutton and I began the process of building our own pinhole cameras. Audrey and I are both absolutely fascinated with photographyand have been trying to experiment with it a lot more lately. Soon we will be doing astrophotography on camping trips, but for right now we decided to do a project that was slightly more simple. I have heard so many wonderful things about pinhole cameras and the amazing photos they can take, so I suggested we make our own. We started researching online, and found this tutorial: http://www.instructables.com/id/How-To-Make-A-Pinhole-Camera/ After viewing the tutorial, writing up our proposal and having it approved, we began to build the cameras. I brought in an old christmas present box, Arizona tea can, a thumbtack, sandpaper, black electrical tape, and a ruler. We first found the exact center of the front of our boxes, where the pinhole would go. We then cut 2 inch by 2 inch squares from the Arizona cans, and poked a pinhole in the metal piece. Next we sanded the metal until there was no longer any sharp pieces poking out of the pinhole. After this,we cut a 1 inch by 1 inch square in the center of the front of our box, and attached the pinhole piece to the opening. We used electrical tape to cover the sides in order to block out any light. Next we made flaps, or "the shutter" piece that would go over the pinhole and taped it on as well. Then we cut out the proper sized photo paper for each of our cameras, but we are not sure if the paper we used was supposed to be unexposed to light or not. Tomorrow we plan on taking pictures with the cameras, and if the photo paper ends up having to be unexposed, we will instead do research on the chemicals that we will need to use in order to develop the photos later. We also might have to reserve a room in the school to use as a darkroom. The Science Behind Hydrosols: Hydrosols, or distillates are typically used as scented room or body sprays. In our case, they were water based, and are scented from the oils found in plants. They are made by grinding plants such as roses, sage petals, and citrus fruits. After the plants you want to use are ground up, they go through a distillation process. (In a post below, I go through the whole process) Distillation is considered as the process of different substances vaporizing. Vaporization is when a solid or a liquid converts into a gas. Plants vaporize at different levels of heat. In order for our plants to vaporize, we ground them up, and put them in a flask that would soon heat up the water that the plants were sitting in. As the water heated up and boiled, oil from the plants was released along with water from the flask and drops from both formed onto the sides of the tube. Eventually, the oil dripped down into our beaker, which we then bottled later. Because hydrosols are water based, the scents are not as strong or long lasting. Reflecting on Hydrosols: I had a great time experimenting with hydrosols. In the beginning, Audrey and I had no idea how perfumes were created. During the process of this experiment, I learned how to set up a heating apparatus and how to distillate plants. Sadly, when we finished creating our scents, they didn't smell the best. We think we used to much plants per hydrosol, causing it to be overwhelming. We hope that sometime soon we will be able to try this process again, and this time, only with lavender. Having only one scent will simplify the process and won't make too dramatic of a smell. I also had a great time working in this partnership. I feel like Audrey and I cooperated and collaborated well. We were always both working on something, so nothing felt like it was us doing it individually. Today we went and checked on our rock candy mixtures that have been undisturbed for 7 or 8 days. We had 5 different jars with multiple colors and flavors. One of the jars had 1/2 cup of water and 1 cup of sugar. Three of the jars had 2 cups of water and 1 cup of sugar, and 1 cup of water and 3 cups of sugar. When we checked back on them today, the only one that had formed rock candy was the one with 1 cup of water and 3 cups of sugar. This was because it had a higher sugar content compared to the amount of water. All the other mixtures stayed the same, and showed no sign of crystallization. Eventually we poured out the leftover syrup, and only sugar crystals remained. Below are images of the pieces of rocky candy we created. The Science Behind Rock Candy:
When we put the string inside the rock candy mixture, it was to provide a surface for the rock candy crystals to grow on. Soon small crystals form on to the string and later on the growth of more crystals will start from these points. We then created a form of supersaturation, which is when a solution contains more of the dissolved material (sugar) than what could be dissolved by the solvent (water). The way we created a supersaturated solution was by pouring and stirring sugar until it dissolved into the hot water. A supersaturated solution is unstable, meaning that it has more solute than can stay in liquid form. This allows the mixture to precipitate, leaving the sugar crystals behind. The other process involved in creating rock candy is evaporation. Throughout the days that we let our rock candy mixture sit undisturbed, the water slowly evaporated from the mixture. When we first started letting our mixtures sit in the cubby, we had them covered with tin foil. We later realized that we needed to uncover these or it wouldn't be able to evaporate as well. There needed to be air in order for the energy molecules to escape and evaporate the liquid. Evaporation is caused by the energy of molecules in motion, producing heat. When the molecules move, and hit each other, and transfer energy. Eventually the energy escapes into the air and evaporates. The evaporation is what left behind our rock crystal candy. When we checked on our rock candy yesterday, the liquid wasn't all the way gone, but the amount there was originally had decreased. If we would have left it to sit longer, more candy would have formed and more of the liquid would have evaporated. Once we poured out the liquid, many crystals remained, sticking to both the string and the sides of the jar. Reflection on the Process: Overall, I had a lot of fun doing this experiment. I learned a new skill of candy making and I also now have a better understanding of how evaporation works. I also enjoyed working in a group but sometimes it was challenging. It was useful to be in a group because it allowed us to help each other when we were confused on the process of making the candy. At other times, it was difficult because there wasn't enough materials, and it was hard to decide who got to do what first. In the end, I think the benefits of working in a group outweighed the challenges. I definitely think I will work in a group again soon. This week, my friend Audrey Sutton and I are creating hydrosols. Hydrosols are scented sprays or perfume made by steam distilling plant materials. Audrey and I were really interested in creating perfumes, so we decided to make our own from multiple plant materials. To create our hydrosols, we each collected numerous plants and flowers and brought them in to class the next day. We ended up not being able to make our hydrosols on Friday and instead we made them Monday.
Monday: Today we worked on creating Audrey's hydrosol. We first grinded up the eucalyptus, sage, rosemary, dandelions, and lavender using a mortar and pestle. Next, we placed our plants in a round bottom flask and poured water to just above where the plants reached. Then we placed the flask into a heating dish and assemble a distillation apparatus onto the flask. After everything was put together, we turned on the heat and soon the water in the flask started to boil. The water sent steam up the tube, and the oils from the plants separated from the water and dripped down into a beaker. Unfortunately, our hydrosol didn't smell the way we wanted it to, and now smells like artichokes rather than herbs. Part of this is because steam was escaping from the apparatus. Hopefully tomorrow our plants will create a better smelling hydrosol and we can find an apparatus that works. Tuesday: Today I created my hydrosol. I used rose petals, lavender, rosemary, and a little bit of sage. My plant mixture smelled very nice once it was finished being ground up. I then followed the same steps that we had done the day before, except this time the apparatus was a little bit different. We had a spiraling pipe coming from the flask, that then connected to a tube, that was attached to the beaker. This way, no steam could escape. The hydrosol today, turned out a little better than yesterday, but still smelt a little strange. Tomorrow we might bring in a ton of flowers to hopefully create a better smelling hydrosol. Soon I will also post pictures, and more of a scientific explanation of our process. Monday: Today we learned about what types of experiments, activities, and lessons we could do in order to earn our full 250 points. Together, a few of my friends and I thought about what experiments we could do. We eventually came up with the idea of making rock candy. After coming up with this idea, we had to fill out a planning sheet. We are each creating our own jar of rock candy, so its individual in that sense, but we are all working together as a group and helping each other along the way. Tomorrow we are going to begin the rock candy making process. Below is a picture of the proposal form I filled out on my experiment. 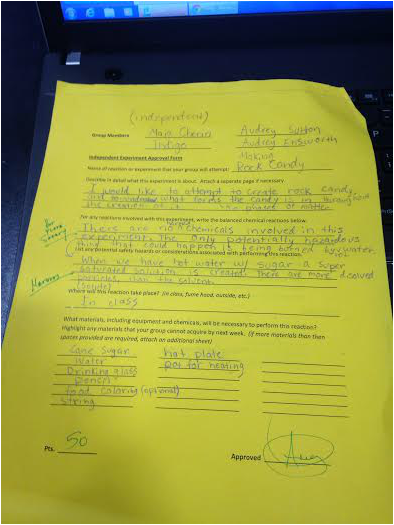 Tuesday: Today is the first day of our rock candy making experiment! Yesterday we all planned out what supplies to bring and researched what steps we needed to take to properly create the rock candy. We found a nice tutorial online here: http://www.instructables.com/id/How-to-Make-Rock-Candy/ that showed us how to create the candy. Here is a list of the supplies we needed to create the candy: mason jar, cotton string, stick, spoon, pot for a stove, sugar and water. After gathering all the supplies, we started making the candy. I put a small cooking pot with 1 cup of water in it, on top of a hot plate and turned the power up to ten. We then waited for the water to steam and lowered the power down to three as we stirred in 2 cups of sugar. Once the sugar was fully dissolved into the water, we poured it into a mason jar. After our hot mixture was poured in the jar, we added food coloring. We then took a cotton string and tied it to the middle of a wooden popsicle stick. Next, we lowered the string into the mixture and it was held in place by the stick resting over the top of the jar. Then we covered the jar with foil and placed it in a cubby so it wasn't disturbed in the crystallization process. According to the tutorial online, the mixture will crystalize onto the string within a week. From now until next Tuesday, we have to leave our jars alone, but we will check on them each day. Unfortunately today, we only had time to do Indigo and Audrey Ensworth's rock candy mixtures, but tomorrow we will do me, Audrey Sutton, Natalie's mixtures. 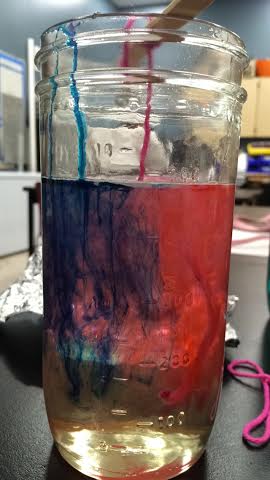 Tuesday Night: I forgot that I was going to have to leave school early on Wednesday, and therefore I would miss chemistry class. This means that I wouldn't be able to make my candy and would be behind. So tonight I decided to make my rock candy at home. I followed the same process as stated above, but at my house I only had one cup of sugar left. So I shortened the recipe to a 1/2 cup of water and 1 cup of sugar. My rock candy mixture still seemed to be a success and I brought it in to school the next day to store it. Wednesday: Today I brought my jar into class and stored it with my other teammates rocky candy mixtures. While I was gone today my group added flavoring to our candy mixtures so that it will taste even better when it is finished! Some of the flavors our group used was strawberry, watermelon, and peach. I chose to have mine peach flavored and my group members were very nice and put the flavoring in for me while I was gone. Today was the final day of making the rock candy mixtures, and now all we can do is wait the full seven days to see how they turn out. Once the candy starts to show signs of crystallization, I will post pictures. Here is a picture of all our rock candy mixtures being stored in the cubby: 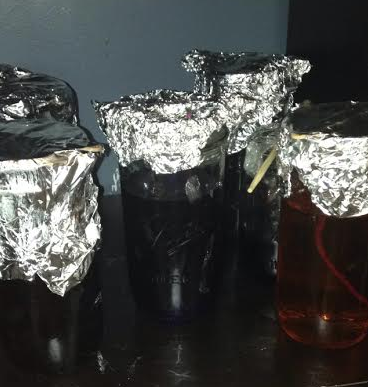 |
AuthorWrite something about yourself. No need to be fancy, just an overview. CategoriesArchives |
 RSS Feed
