|
On Tuesday of this week, we made penny batteries in chemistry class. To start things off, we got into groups and had 1 member go get around 10 pennies that were made after 1986. (Pennies before 1986 were made from 95% copper and 5% zinc. Pennies after 1986 are made from 7.5% zinc, 2.5% copper.) Then my group members, Audrey Sutton, Audrey Ensworth, Indigo, Betty, and I headed outside. We dropped the pennies on the ground, and slowly started scraping them on the cement. We were trying to scratch off the copper design on one side of each penny in order to create our battery. It took foreverrrr to finally scrape down all the pennies, we even had to use our feet and slide the pennies all over the sidewalk. But eventually, when we finally had the sides all scraped, we headed back inside for the next step. I then cut out tiny 1 in. x 1 in. squares from a cardboard folder, got a small piece of tin foil, and grabbed a small beaker full of vinegar to soak the squares in. After the squares had soaked for about 30 seconds, I laid out a small piece of tin foil, and set a penny on top of it with the scraped side down. Then, I placed a square on top of the penny. I kept repeating these same steps, until we had 7 pennies in our battery stack. On the last penny however, we did not put a square on top of it. Next, we got and LED (light emitting diode) and placed one leg on the tin foil, and the other on the penny. This made our yellow LED light up just like it would have with a regular battery! The Science Behind Penny Batteries:
To start things off before the actual battery lab, we learned about electrochemistry. Electrochemistry is essentially energy from chemicals, which in this lab we learned can come from household chemicals like vinegar. To help us understand electrochemistry, we learned a few basic ideas such as the following: 1)All elements have different attractions to electrons (electro negatives), 2)When an atom that loses electrons more easily than an atom of a different element come in contact, electrons will transfer. In our penny batteries, electrons will flow from the zinc, through the soaked cardboard, to the copper. But, one important thing I learned is that the more pennies you have, the more volts your battery will have. Each stack or cell you add will increase the overall charge because they are arranged in a series. This means that if you have a larger amount of pennies in your battery, your light will most likely be brighter than someone with less pennies. The Chemistry: At contact with the electrolyte solution (vinegar), each metal forms positive ions. Since zinc loses electrons more easily, they travel to the copper ions. Reflection: I found this penny lab to be very interesting. I had no idea you could make electricity with household objects like vinegar, cardboard, and pennies. To me, the group work on this was a little challenging. I didn't feel like there was enough for each person in the group to do, it felt more like an individual activity. Because of this, I didn't feel like everyone was fully engaged. Although I felt like this, I still think my group members and I did a great job, and had fun all while doing it.
0 Comments
Before break, we made "magic" sand in chemistry class. Magic sand is basically water proof sand. To do this activity, we got into groups of about 4-5 people, and partially filled a glass tray with pink and green reptile sand. Then, we went outside and sprayed it with a waterproof silicone spray. Once we sprayed it on the sand, we swished around the sand in the tray to make sure it was distributed evenly. As we added each coat, the green and pink sand turned to orange, and seemed to have a different consistency. We had to do several coats of this spray on the sand to make sure it would work. Once we finished mixing around the sand, we headed back inside for the next stage of the experiment- testing the sand's ability to be waterproof. We each got beakers filled with water, and slowly started dropping handfuls of sand into the water. The sand didn't disperse throughout the water, instead it stayed in a glob like form. It was almost like the sand was in tiny bubbles, protected from the water. The Science Behind Magic/Waterproof Sand:
Before we went outside to spray the sand, we learned quite a bit about what exactly makes the sand waterproof. First off, we talked about ionic and covalent compounds. Ionic compounds form between metals and non metals, and are held together by strong ionic bonds. The positively charged ions in these bonds are called cations, and the negatively charged ions are called anions. In ionic compounds, cations and anions attract together to form an ionic bond. Once the bond is formed, they transfer electrons. An example of an ionic compound is table salt. Covalent compounds, on the other hand, form between nonmetals and nonmetals. In their bonds, the electrons are shared rather than transferred. An example of a covalent compound is bubble gum. After hearing about what ionic and covalent compounds were, we talked about their nomenclature (their names) and when we should alter it. If you look at one of my previous blog posts, you can see all the information on nomenclature for compounds. Another key thing we learned was multiple important chemistry terms. Below I will list them with some commentary. Solubility: The ability for water to dissolve things. (This dictates by pressure and the environment somethings in.) An example of this is when you put sugar in hot water, and it slowly melts into the water. Almost like when I created rock candy with my friends. Desalinate: To take the salt out of something. An example of this would be taking water from the ocean and removing the salt from it. Immiscible: Unable to mix. This is what happened when we put our water proof sand in the water. The sand stayed in a "bubble" instead of mixing into the water like how normally would without the water. Polarity: One side is positive, one side is negative. An example of this would be a battery. Hydrophilic: Things that dissolve in water (ionic things). Water can't dissolve oil because it's not polar, and there's no charge in oil. Hydrophobic: Things that won't dissolve in water. Normally, without a special spray, sand is attracted to water and is hydrophilic. This means that it will dissolve in water. This is why we used a spray with silicone in it to coat the sand. Since silicone helps things to be hydrophobic, this allowed the sand to be waterproof. Once we changed the sand from hydrophilic to hydrophobic, it also became a covalent compound. Refection: Overall, I found this lab to be very interesting. I had no idea there was a way to make sand waterproof, but now I do! When we tested out the sand, My group member Morgan and I thought about how helpful the spray would be for certain things, like a swimsuit. I think this spray can be useful in many ways, and I would like to try it out on some products. As for group work, I think this lab went really well. We didn't have any issues collaborating, which made the lab even more fun. I think part of this was because making the waterproof sand was a fairly simple task, so there wasn't really a reason for any arguing. Hopefully next time we do an experiment, even if it's a bit more complicated, we'll still be able to get along and agree on things in the same way we did for this lab. During this 3rd section of the semester, Audrey Sutton, Morgan, and I decided to pick a simple and fun lab to do- Snow! Below is our proposal: 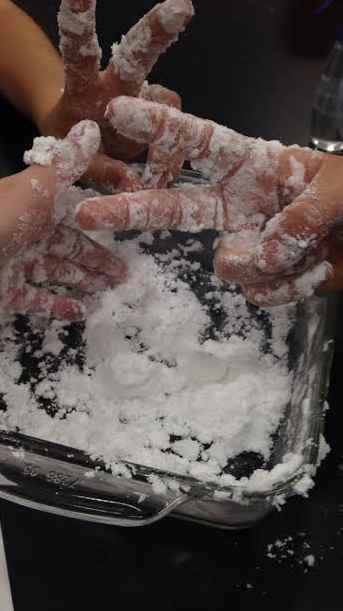 To make our snow, we gathered two simple ingredients- shaving cream and baking soda. First we got out a glass tray, and then we sprayed some shaving cream into it. Next, we added baking soda to the shaving cream. After this, we stirred and mixed together the baking soda and shaving cream with our hands and were left with a paste like mixture. The "snow" still seemed to be a bit liquidy from the shaving cream, so we added more baking soda. Once we figured out just the right amount, the snow seemed to be more powdery. It felt like real snow, but much softer. It even seemed to be a bit cold. After we were satisfied with our snow and the shapes we created from it, we sprayed vinegar on it. The snow started fizzing, bubbling, and melting. This left us with puddles rather than snow.
The Science Behind Snow: There's not much complex science to the way we created snow. Shaving cream is liquid soap with many gas bubbles in it, and baking soda is in solid form but is an acetic acid. When we shaped the two together, is created a paste like substance at first, but then changed back to more of a powder as we added more baking soda. Because it seems to be a powder like substance, I would consider it to be a solid. But how does the snow erupt? Because the majority of the snow is baking soda, it reacted with the vinegar in fizzy way. This was actually a chemical reaction. The bubbles the reaction formed are releasing carbon dioxide gas. In this reaction, baking soda acts like a base and takes protons from the vinegar which is an acid. The reason this foaming action occurs is because bicarbonate (baking soda) reacts with acetic acids (vinegar). Reflection: My snow making experience was fairly pleasant. I got to work with some of my friends and enjoyed doing this fun experiment. One thing I am upset about though, is that I have done many things like this before. I have done a lot of baking soda and vinegar reaction work in my time, and think I could have chose something new. Next time I will hopefully allot more time to planning so that I can do something new. Before break, Audrey Sutton and I decided to make ice cream. We saw that many other classmates were making it and wanted to give it a try, so we started looking up some recipes. We came across a berry, vanilla, brown sugar recipe that sounded very unique, so we gathered all the ingredients and met over break to make it. Audrey has a cuisinart ice cream maker, much like the one at school, so we were good to go. The process: First, Audrey froze the piece that goes in the machine overnight. Then, the next day we met up and combined all the berries, milk, vanilla, brown sugar, lemon juice, and whipping cream. After all the ingredients were stirred together, we poured the mixture into the ice cream maker and it started to churn. At first, it was a very watery mixture, but as we kept checking on it it got thicker. It took about 30 min total for it to get to the proper thickness. After the ice cream was thick enough, we each scooped ourselves a bowl full and enjoyed our creation. The ice cream was amazing! It had such a unique flavor, and I definitely want to make it again. The Science Behind Ice Cream: Besides all the sugar, milk, and vanilla, one of the main ingredients in ice cream is air. Air makes up anywhere between 30%-50% of the total volume of ice cream. When you have the ice cream mixture (before it's actually frozen) the taste is extremely sweet compared to the taste of the end result. "This is because the structure of a substance can have a big effect on how it tastes. (acs.org)" Once the whipping cream in the ice cream mixture has been fully whipped, then the ice cream will have a better taste. This is because the structure of a substance often effects how fast flavor molecules are released into the mouth. Not only does the air effect the taste of ice cream, but it can also effect it's density. The more air that is put into an ice cream, the lower the density, and the looser the particles are packed together. Typically, more expensive ice cream brands will use a lower amount of air, making the ice cream have a higher density and not melt as fast. Another key part to ice cream is the fact that it is an emulsion, a combination of 2 liquids that don't usually mix together. Instead of them mixing together, one liquid is dispersed into the other. The liquid particles in fat are spread throughout all the sugar, water, and ice. 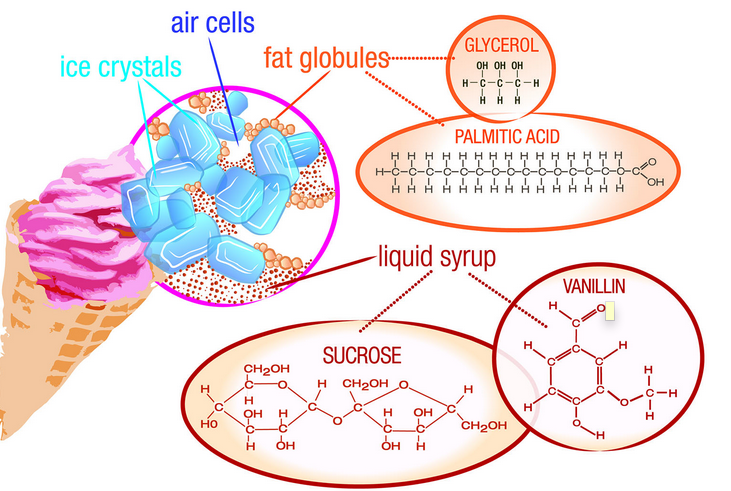 the composition of ice cream How does it freeze?
In order for the phase change of going from a liquid to a solid to occur in ice cream, heat must either be lost or gained. In this case, heat is lost. Ice cream freezes at a lower temperature than water, so having ice alone is not enough to freeze it. The ingredients, sugar and fat, in the ice cream interfere with the formation of ice crystals, causing us to need a lower temperature to freeze it than ice provides. Instead, you can add salt to the ice. Adding this salt lowers the freezing/melting point of water, and having this surround the ice cream allows it to freeze before the actual ice melts. Reflection: Overall, I had fun with this lab. It was a quick and easy way to learn about some of the phase changes that occur in everyday life. One thing I am upset with though, is that I chose to make ice cream rather than a more complex lab/experiment. Ice cream is fairly simple to make, and I think I could have spent my time more wisely on something more interesting. I think I need to plan things out better and more in advance so that I'm not resorting to some of the easier labs that people have already done. Hopefully in the next section I will plan out things better ahead of time. 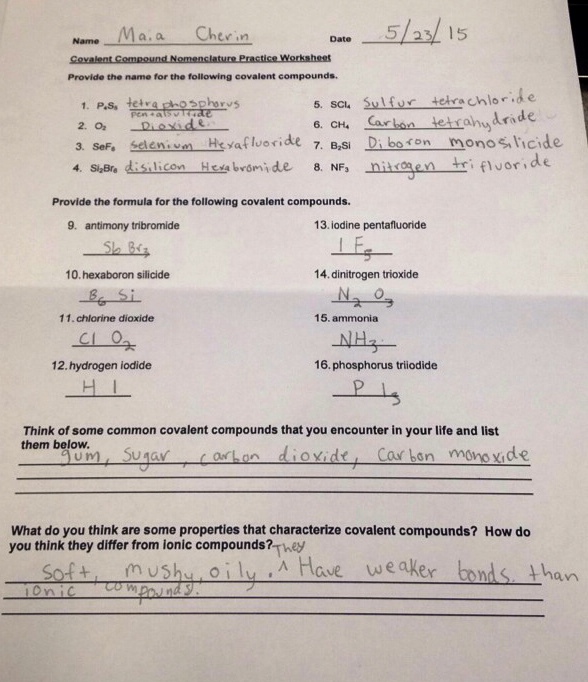 To answer the first section of this worksheet, I would look at the name of the first element in the covalent compound and add a prefix to it, depending on what number was after it's symbol. Then looking at the second element, I would do the same thing, except I would change the suffix to "ide". For example if I had P4S5, it would be tetraphosphorous pentasulfide.
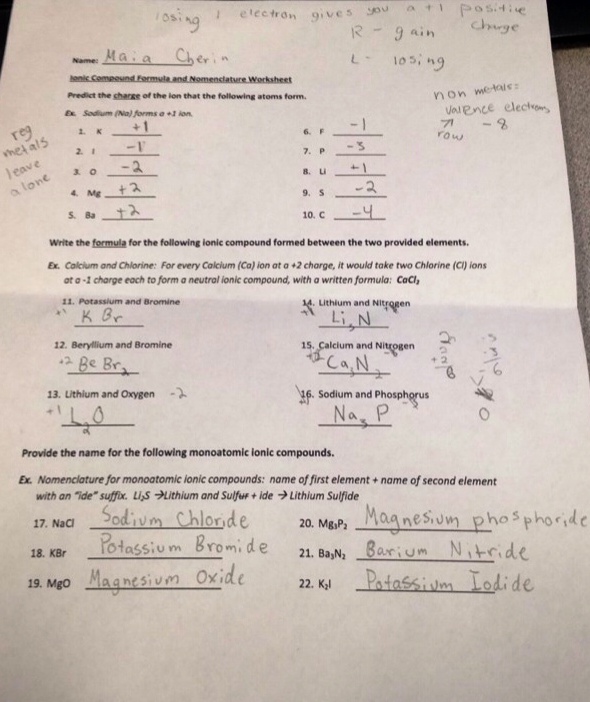 After doing the magic sand lab, I worked on this ionic compound worksheet. I learned how to write the formula for ionic compounds formed between two elements. For example, if you take Beryllium and Bromine, you would have the formula of BeBr2. Since Beryllium is in the 2nd column on the periodic table, it has a +2 charge. Since Bromine is in the 17th column, it has a -1 charge. In order to complete the valence shell, you would need two bromine (-2 charge) in order to balance out the beryllium (+2 charge). To solve the first section of this worksheet, I had to look at the columns again and find what charge each element had. To solve the last section, I had to change the ending of each second element in the ionic compound to an "ide" suffix. For example, when I had NaCl, I kept sodium as is, and changed chlorine to chloride. This left me with the Sodium Chloride.
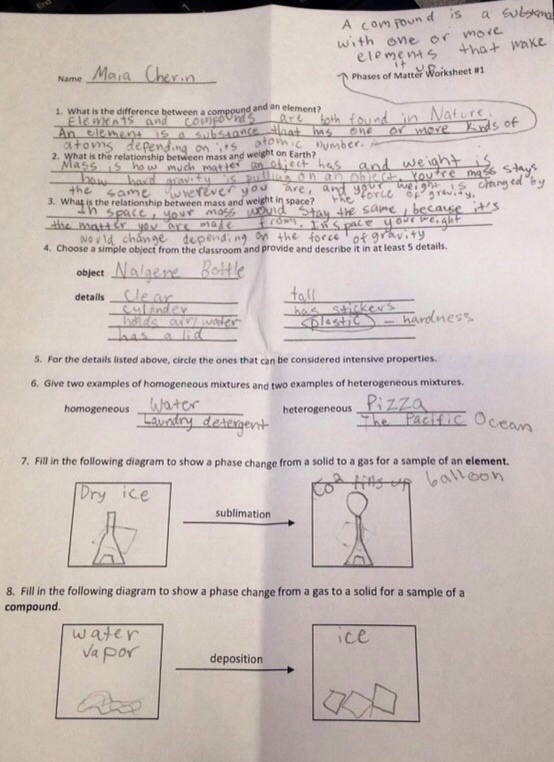 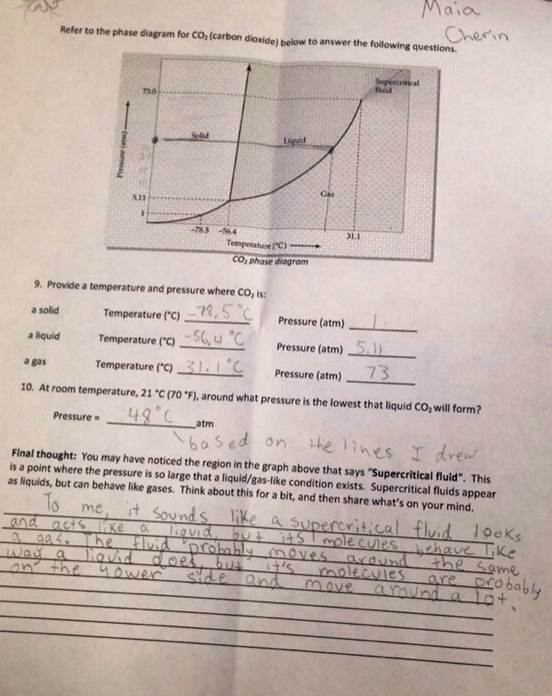 On the front side of this worksheet, I had to do some research on weight and mass. I had never thought about the way that our mass stays the same in space and that our weight changes from the effects on gravity. It really made me think about what effects space can have on your body. On the back side of the worksheet, I was having trouble understanding the diagram, so I asked Ms. Gruby for help. She helped explain to me the relationship between temperature and pressure and how it changes the state of an element. Now I understand what relationship the diagram is trying to show. I also enjoyed the last question because it allowed me to think and tie in previous things I have learned. I was able to apply and connect prior knowledge.
While on the camping trip to Mount Laguna, a fellow astronomy club member, Gabe, told me, Audrey, and Morgan that he wanted to take pictures with steel wool at night. Gabe had built a cage like device from a whisk and tied it to a rope. Then he would fill the cage with steel wool and light it on fire. While he was a safe distance away, ready to capture the image on camera, we would swing around the cage using the rope. Sparks flew around in a circle and it was absolutely amazing! We each took turns spinning the contraption around and eventually had a ton of sick photos taken by Gabe. Below is one of the best shots from when I was spinning around the wool. 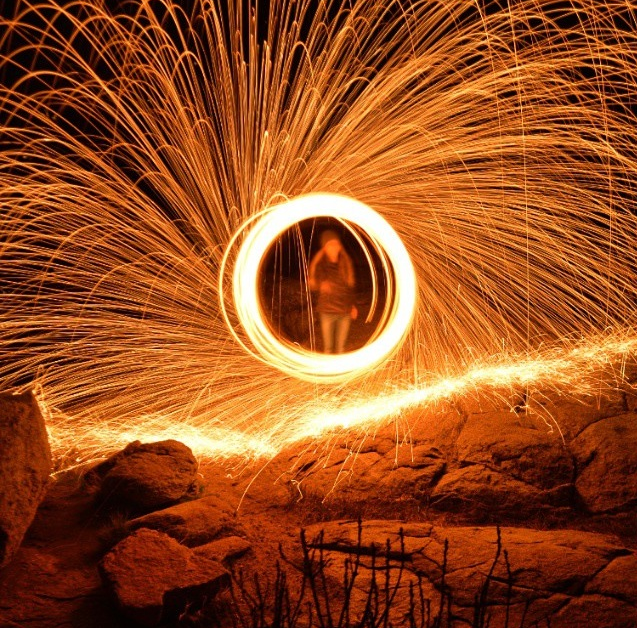 Science Behind Steel Wool:
Steel wool is a bundle of fine pieces of sharp-edged steel filaments that are also very flexible. You can rip pieces of it off from the bundle and use it to polish wood or metals. Steel wool is made from low carbon steel, by starting as a wire and then being transformed into a bundle through shaping, slicing, and folding in various machines. But why does it burn? The reason steel wool burns easier than more everyday metal objects, is because of its bigger availability of oxygen and more powerful build-up of heat. When you have a regular lump of steel, most of the steel is in one cluster, but having the steel be spread apart in steel wool, provides more surface area for the wool to be in contact with air. When there's more air available, there's more iron to combine with it as well, causing heat to build up in a small area. Having so much heat, creates the burning effect, which allowed us to send sparks around in a circle. Once our steel wool was lit, the bundle slowly started to burn, and quickly spun it around for the picture. Even in the steel wool making process, the wool can burn easily from the heat and friction the machines produce. To reduce the fire hazards from the heat these machines cause, manufacturers will often use oil to decrease friction. Although this can reduce some fire risks, there are many others. Steel wool naturally contains oil, causing it to have a chance of spontaneously combusting. To take the pictures of us spinning around the steel wool, we used the same camera settings and methods as we did for the stars. We set a long exposure to capture as much of the light as possible from the sparks and had a high ISO for clarity. Reflection: Overall, I had a wonderful experience on this camping trip and mad life long memories. It was so amazing getting to see shooting stars and to actually witness the burning of steel wool. I had never taken photos like that before and think it was so fun to experience something like that. I definitely want to take more steel wool light painting photos soon! Recently Audrey Sutton and I joined the astronomy club at High Tech High, and have to say it is one of the best decisions I've made. I feel so welcomed to the club, and am excited about all the work they do. This past Thursday (3/19), I got the opportunity to go on a one night camping trip/Star Party to Mount Laguna. Prior to the trip, I talked to my friend Audrey, and we planned to take pictures with her camera of the stars and "light paintings". Before leaving for the trip, I made a proposal of what constellations I wanted to capture an image of with a star "hit list". On my proposal, I said I wanted to shoot pictures of The Big Dipper/Ursa Major, The Little Dipper/Ursa Minor, Orion, Taurus, and Gemini. I also wanted to sketch them if it was possible because I was so excited to experience the stars. Thursday Night: Tonight at 7pm we will be leaving school to drive up to Mount Laguna. After school, I headed home and packed up my stuff, then drove back to school. Once I got there, Audrey, Morgan, Brian, and I left in a HTH van, and other astronomy club members left in other cars. After driving for about an hour, we arrived to Mount Laguna. We set up our tent, which we struggled with at first, and then grabbed our camera gear. We had a really nice campsite spot near the end of the campground that lead into a field. We walked down a trail and set up our tripod and camera next to a telescope. Unfortunately, the sky was a little cloudy, so I wasn't able to find all of the constellations I had hoped for. But I did see several shooting stars and Orion's Belt and the Seven Sisters with the help from other Astro Club members. Because Audrey and I couldn't identify all the stars on our hit list, we decided to just shoot multiple pictures of the night sky and test out different settings on the camera. Even though it was our first time taking pictures like this, I think they turned out great! We took multiple shots of the sky and also several light paintings. To take the pictures of the sky, we set a long exposure time of about 30 seconds on the camera, which is essentially how long the camera lens is open for depending on how much light you want to capture. During this time, the camera will take in any light, which in our case was the stars. We also had to set the ISO (pronounced eye-soh) to a specific number which indicates how sensitive a camera is to light. The higher the ISO, the better the camera is at soaking in light. Having a long exposure and a high ISO helped us to capture beautiful images of the stars. We also used these camera settings to take pictures of our "light paintings." To take these, we would use almost the same settings, and then would have somebody outline another person with a flashlight during the time of the exposure. This allowed the camera to soak in all the light in the exposure. My friends and I would also press the shutter button to start the exposure timer, and then we would run around blinking flashlights, in order to create a ton of cool light streaks. Below are our best star and light painting shots. More Information on Camera Technology:
A camera's exposure determines how light or dark a photo will appear. In order to adjust this, you can use three camera settings: aperture, ISO, and shutter speed. Aperture is the amount of area of light that can enter the camera. Shutter speed controls the amount of time of the exposure (the time the lens is open). ISO is the level of sensitivity of your camera's sensor to the the light you are going to be capturing. For our images, we set the ISO very high to around 1300 and had the shutter speed set to around 30 seconds. This allowed the camera to capture a good amount of light within the field of view. For our aperture, we set it to about F4. The F in this means focal ratio, f-ratio, f-stop, or relative aperture. We chose a high aperture because it allowed us to shoot a large depth of field. Reflection: Overall, I had a wonderful time on this camping trip. I definitely want to go on another and hope to capture more photos the next time around. On this trip I was so happy to look through a telescope for the first time! I got to see a gas cloud, and Jupiter which was amazing. I also got to work with steel wool, which I will be writing about in my next blog post. |
AuthorWrite something about yourself. No need to be fancy, just an overview. CategoriesArchives |
 RSS Feed
