|
In my last post, I thought it would be my last time writing on this blog since we were no longer doing individual experiments. Luckily, I thought wrong and am so happy that I get to continue posting. Today, I worked on a molecule lab with my friends, Betty, Audrey Sutton, Audrey Ensworth, Indigo, Morgan, and D'Isaac. To start things out, we worked together on a worksheet where we had to write the Lewis dot structure for various molecular structures. To do this, I first looked at the compound equation and identified how many valence electrons each element had. After calculating the total number of valence electrons in the molecular structure, I started to write down each element and then draw the amount of electrons around it for each. This was hard at first, trying to make sure each element had the right amount of electrons in total, but after getting more help on double bonds, I started to understand. My group and I helped each other out by each trying to draw the structure and then comparing. I think this lab was very insightful, because I had never thought about a way of representing these molecules in one simple drawing. In a way it was almost like a puzzle, trying to figure out the right amount of dots for each structure. Below is a picture of my lab work, with all of the Lewis dot structures. 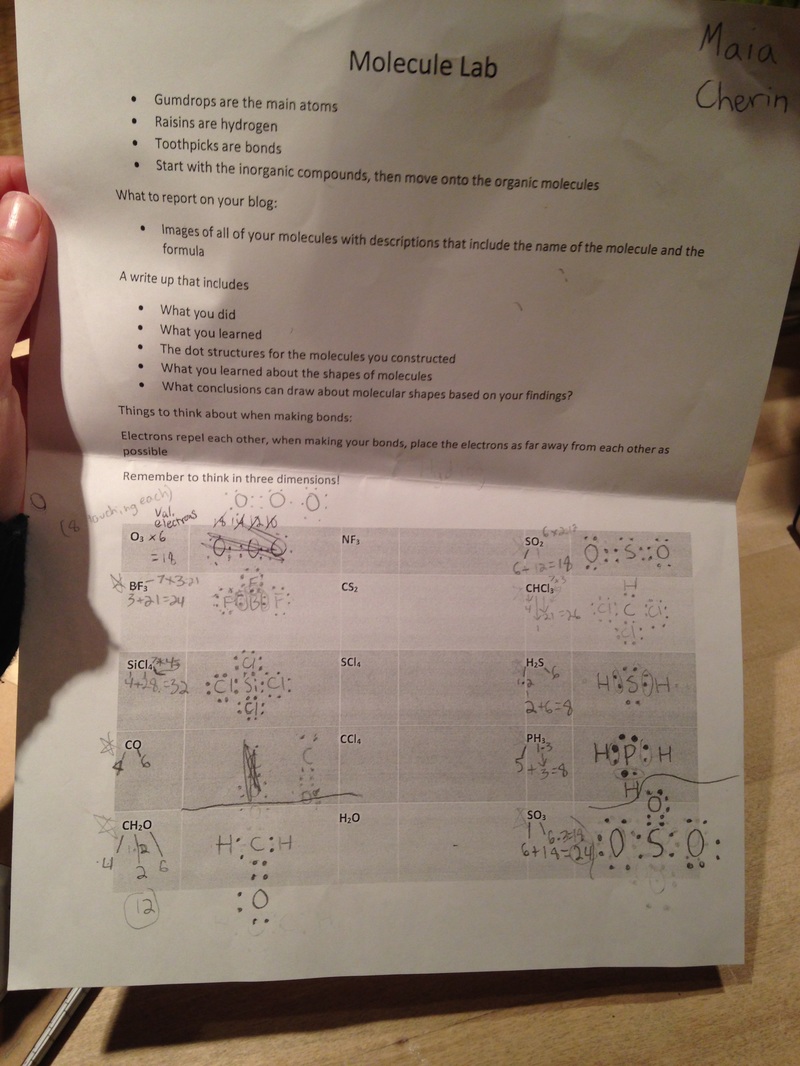 After the worksheet, we began to make actual structures of the molecules using gumdrops, raisins, and toothpicks. Each raisin represented a hydrogen bond, each gumdrop represented an element, and each toothpick represented a bond. We started by having everyone in the group pick a molecular structure. Then, looking at our dot structures, we would decide on what gumdrop color would represent which element. Then, we connect a toothpick between each gumdrop for every time there was 1 bond and 2 toothpicks for every time there was a double bond. This was challenging at first, because on our diagrams, every time there was two dots, that meant one bond. But we had a common misconception that two dots meant a double bond, when really a double bond was four dots. This caused us some trouble when working with the toothpicks and gumdrops, because we were putting double bonds in places where they shouldn't have been. After a little bit of practice, we started to get the hang of it, and in the end I was very happy with the work we did. For the organic molecules below, we essentially did the same thing as we did for the regular ones. Except in the organic molecule structures, certain toothpicks had to be angled, or connected in shapes. 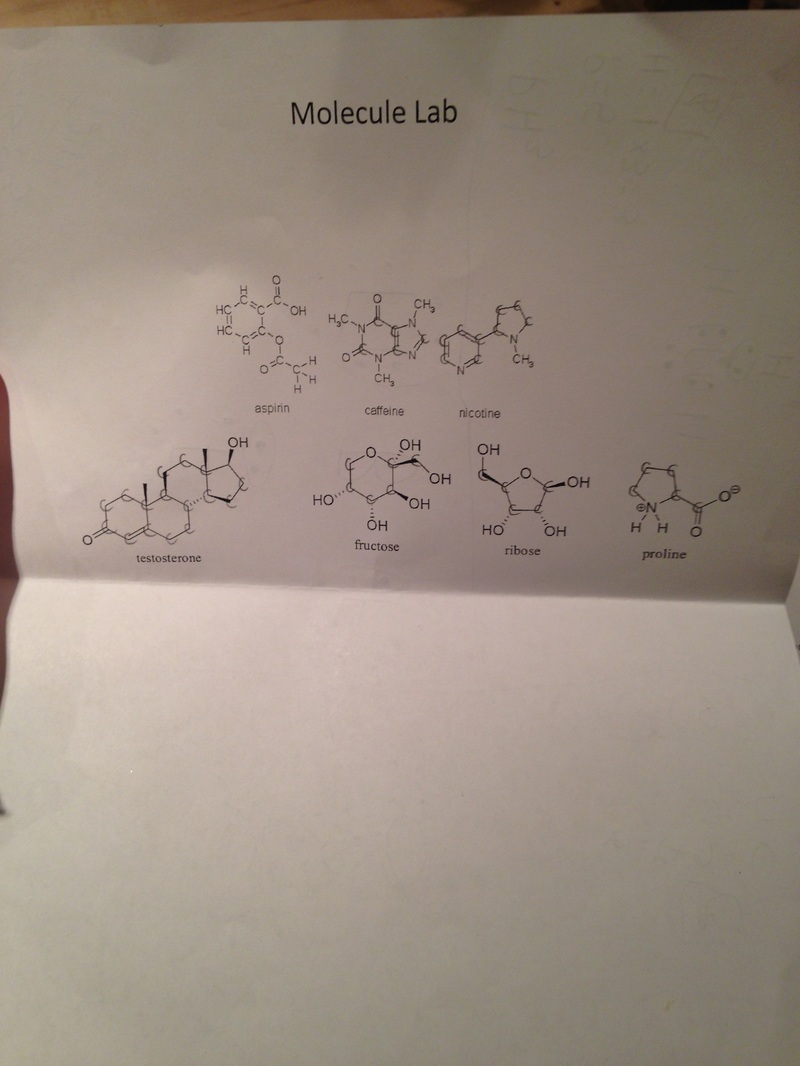
0 Comments
This semester of chemistry has been an amazing experience, and has allowed me to discover so many things in the world of science and about myself. Although I typically worked with my friend Audrey on each experiment, there were many times where I had to work with others. I think this allowed me to work on some of my collaborative skills, such as empathy and organization. When I worked with others on labs, I realized that it was important to tap into peoples emotions and be sensitive to the way they are feeling. Understanding science concepts is pretty challenging for some, including me. This is why I learned to be patient and try to help others, or ask for help when I needed it. I also learned how important it is to be organized and communicate with others. If you don't communicate with your friends on when, where, or what you need for your experiment, you fall behind. Besides group work, I learned a lot about myself. I think this chemistry class let me discover one of my true passions; science. I started out scared to come to class because in the past, the way I was taught about science was intimidating, and felt like a ton of fact memorizing. Now, I learned that science isn't actually all that scary! It turned out to be fascinating! I became excited for chemistry class every day because it inspired me so much. I made so many discoveries and learned so many things that I feel are important. I mean, not many people know how film is developed, or how astro-photography works, or even why ice cream freezes, but now I do!
Throughout the semester I felt motivated to work and do experiments, but I didn't always feel motivated to come up with my own. I kept looking at what other people were doing in class, like candle making, and just thought, "hey, I should try that." It was almost like I was copying what people had already discovered. It caused me to learn less, because I already knew what to expect from the experiments. It wasn't until later when I really felt inspired to come up with my own experiments and relate in my passions. Some of my passions are: photography, music, art, and the outdoors. I found that many of my favorite experiments involved these things. To involve photography, Audrey and I made pinhole cameras and developed photos and we did astro-photography on Mount Laguna and Joshua Tree. To incorporate my love of music, I built a record player with Audrey. To engage in my love of art, I'm soon painting a mural with friends. And for my love of the outdoors, I've camped, collected rocks, and worked with plants using hydroponics. Looking back, I believe that these times were when I was most motivated. As this semester's chemistry class comes to an end, my newfound love of science will not. I finally feel like I have somewhat of a passion and will take away so much from this class. I learned not to give up; if it's not the answer you expected, you still made an exciting discovery. I learned to work as a team; others thoughts can spark an idea you wouldn't have had without their input. I learned to appreciate science and the beauty behind it; sometimes the complexity and composition of things is what makes them beautiful. But most of all, I learned how important it is to appreciate our earth and all of the secrets and discoveries it has in store. Thank you so much for being my teacher Andrew, your words have inspired me and others in so many ways! Goodbye beautiful blog, here's to the scientific adventures that lie ahead. -Maia To end the semester in a fun way, Audrey, Morgan, and I have decided to paint a mural in our school of the solar system. We scouted the school for good mural spots and found an amazing spot near Fahima's room. It is on the ceiling, so that when you look up, it's almost as if you're looking at the stars. We are still in the process of designing, but our painting will have the sun, all the planets, and facts about each. We will also be drawing the orbital paths of each. I will be posting pictures of our design and final painting soon!
Here is one of the facts we have so far: It takes 1,300,000 earths to fit inside the sun For one of our last experiments this semester, Audrey and I wanted to involve something we were interested in with science - Music! Audrey then came up with the idea of creating our very own record player! We both loved this idea and wanted to build it right away. Although there wasn't really a chemistry piece to this project, I still found it to be extremely important in the science aspect of the world. This project would allow us to explore the field of sound and learn by doing. Tuesday: To begin, we first made a cone from printer paper and attached a small needle to the smaller end of it. We then grabbed Audrey's "Color me Barbara" Barbara Streisand album and put a pencil through it's center . Next, I spun the record as Audrey applied the needle. No noise came out, but we expected this already because we weren't using a machine to spin it. After this, we went and talked to our 9th grade teacher, Mike Strong, because we remembered that he had a turn table in his classroom. When we got there, he said that we should make our own turn table, and so he began to think of ideas. The first thing we did was put the record on the wheel of a motorized toy car. We tested it with the cone, but the sound was too high pitched because the speed the record was going at was too fast. Next, Mike had a great idea! He went and grabbed his pottery wheel and drilled our record onto the center and mounted it with a screw. There was a dial to adjust the speed of the wheel, and we set it to the lowest one. We applied the cone, and you actually here sound! After talking to Mike, he let us take the pottery wheel with us, and the next day Audrey and I went into a quiet hallway so we could hear better. Wednesday: Today Audrey and I tested out the record player again, and we began to hear bits and pieces of lyrics. The sound was very high pitched though, even for having the pottery wheel on the lowest speed possible. The sound was also very quiet and the cone was pretty flimsy, so we decided to make a new draft. Audrey scouted the school for a small piece of cardboard, and when she eventually found one, I crafted a cone and reattached the needle. We tested out the new cone and it proved to work way better! Only, now, we noticed the record was wobbly. To fix this, we unscrewed the record and taped spacer pieces that were under it together for more stability. After the record was stable, we tested out the cone again, and could hear the lyrics a lot more clearly, but the sound was still high pitched. The Science Behind Record Players:
The origins of a record player all began with Thomas Edison's phonograph. This device "had a brass cylinder wrapped in tinfoil, which rotated and moved lengthwise when turned by a hand crank. On one side was a diaphragm, or very thin membrane, connected to a needle. When sound waves were forced into the receiving end, it caused the membrane to vibrate and the needle to etch a groove into the foil as the cylinder was being turned by the crank, thus recording sound (Bower, Meredith)." Edison then recorded his first "song", Mary had a little lamb. After further development on this device, people began to purchase the phonograph, only it proved to be difficult for users and the sound eventually wore out. Edison soon decided he would resume work on it 10 years later, but by then another innovator had already began to create his own device that would move us even closer to a record player. Many drafts of record players have been created throughout history, but in most record players today, there are these key parts: a turntable, stylus, tone arm, cartridge, and an amplifier. The turntable is the device that spins the record with the help from a belt drive or a direct drive system. A stylus is the small needle that sits on the record picking up the vibrations. The stylus sits at the end of the tone arm. The tone arm is almost like an arm piece guiding the needle across the grooves of the record. "As this happens, the vibrations travel along a flexible metal strip and wires housed in the tone arm to the cartridge in the end of the tone arm. The cartridge receives the vibrations, which are converted to electrical signals through a coil in a magnetic field (Bower, Meredith)." These electric signals are then sent to the amplifier, which magnifies the sound. Amplifiers used to be in cone shapes, and now with further development are typically electronic. In our version, using a cone, the more air available to vibrate, the more the sound is amplified. This is because sound is produced when air vibrates. Reflection: I have to say, this is probably my favorite project I have done this semester. I found it to be so fun and intriguing. Audrey and I had a great time with this record player, because we proved ourselves wrong. We were not expecting the player to work, but in the end we were capable of hearing some of the record's recordings. I will definitely remember this project the rest of my life. Sources: Bower, Meredith. "How Record Players Work" 07 December 2009. HowStuffWorks.com. <http://electronics.howstuffworks.com/record-player.htm> 09 May 2015. This week, my friend Audrey and I decided to create our very own hydroponics system. We began by researching several tutorials online, but many of them appeared to be too time consuming and costly for our last week of chemistry class. Because of our short amount of class time left, we decided to go with a simple wick style hydroponics system. We found an instructables tutorial online here: http://www.instructables.com/id/Make-a-super-easy-hydroponics-system/ The materials we needed in order to make our system were: pebbles, clean spice jars, cotton socks or a t-shirt, seeds, fertilizer, duct tape, and water. Once we had collected all of this supplies, we began to build our containers for the hydroponic systems by first drilling holes in the lids. Then, we duct taped the spice dispenser pieces to the holes we just drilled. Next, using cotton socks and t-shirts, we cut 15 strips (each system needed 5). We then soaked each strip in water and braided them together, and threaded them through the holes in each spice container. Each container had five strips. After this, we put the strips in our jars filled of water, and laid seeds on the top. We then put large pebbles over the seeds, but realized they were too big and switched to small pebbles later on. The next day, we brought in fertilizer, and sprinkled a little in the water of each jar. After this, we fully secured the lid to the jar with duct tape, and stored them in Brian's office. They have already shown signs of sprouting, and we will check back on them Monday. The Science Behind Hydroponics:
There are many kinds of hydroponic systems out there, but Audrey and I decided to use the simplest one of all: a wick system. Each of our hydroponic systems feeds water with nutrients, or fertilizer, up through the wicks, and to the seeds. The seeds wait for their three needs to be met before germinating: water, good temperature, good location. The seed provides it's own nutrients for growth until it is large enough for it's leaves to make it's food through photosynthesis. Photosynthesis then uses light to create sugar in the chlorophyll of plants and feeds the plant. Often times in hydroponics, there is a light source available for the plant, such as a bulb. Our system doesn't currently have one, but in order for our plants to grow more, it would be beneficial to have one. Reflection: I found this hydroponics experiment to be extremely interesting! I had never built one before, so I found it absolutely fascinating. I am glad Audrey and I worked together on this project because I feel like we work very well with each other. Before the project, I didn't think it was possible for plants grow using socks and t-shirts, but sure enough, our seeds are sprouting. Science and Nature once again have proven to be astonishing. :) This week and last week, I have spent much of my time cutting, shaping, and polishing rocks for The Rock Project. I started by first selecting 3 types of rocks: green apatite, rose quartz, and green opal. I decided I wanted to make necklaces out of these, so I grabbed my rocks and went outside to wear the saw and lapidary machines were. Jiapsi was in charge of the saw, so I had him cut my rocks into smaller pieces that were easier to work with. Next, I began to shape my green apatite into a hexagon type of pendant. This took almost all of class, and then the next few days I had to work on other things, so I decided to return to working on rocks another time. The next week when I went outside to work on shaping my other rocks, the machines were pretty full, so it took a lot longer to sand pieces. I worked on my rose quartz rock almost everyday because I wanted to turn it into a necklace for my mom as a mother's day gift. Unfortunately, I wasn't able to finish my necklace for my mom. The machines had to be used for those making necklaces for village fest, soI had less time to work. But in the end, I'm still proud of all the work I did on my rocks. During The Rock Project, we used a lapidary machine that had 5 different plates. These plates let us shape, soften, and polish all of our rocks. I only really got to use the first three however, because I needed to wait for others to finish with those plates as well before moving on.
The Science Behind My Rocks: Green Apatite:
http://www.gemselect.com/gem-info/apatite/apatite-info.php http://en.wikipedia.org/wiki/Opal http://en.wikipedia.org/wiki/Quartz#Rose_quartz Reflection: I enjoyed the rock project a lot because it was something I had never done before. At times I found it to be very challenging because I had to be patient and wait to change discs on the machine. It was a neat experience to work with rocks in this way, and I definitely think I would do it again. Next time, I would like to schedule more private sessions at lunch in order to allow more time for me to work. Other than that, I am very glad I was able to do this rock project. Over the last weekend of spring break, me and the cdc went up to Joshua tree for a climbing and astronomy camping trip. I had such an amazing time up there! We went bouldering, rock climbing, and hiking. I had never bouldered before, and now I love it! It was nice to be exposed to something outside my comfort zone because it allowed me to discover something I enjoy. At first, I was afraid I would fall off the rocks, or not be able to find my way back down. Then, later on, I felt adventurous and wanted to climb every rock pile I saw. Audrey, Morgan, Gracie, Zoe, and I all had such a great time collecting rocks and taking pictures while we were up there.
|
AuthorWrite something about yourself. No need to be fancy, just an overview. CategoriesArchives |
 RSS Feed
